
Peach Crisp brings back visions of camping, dutch oven cooking, and treasured memories. We have a large garden and every spring we get buckets of fresh, organic boysenberries. We also have a peach tree which produces an abundance of fruit. The peaches are sweet to perfection and so juicy it runs down your cheeks before you even finish your first bite. So yummy and such a joy to look forward to. That said, harvest time can be daunting and while I love eating both peaches and boysenberries fresh, I can’t possibly eat them all without some going bad. That’s where preservation methods play such a huge roll. I have several ways I preserve my fruit. I will showcase some of those ways (including instructions and recipes) in the future on this blog (probably this spring), however, for now I want to just mention a few. Some of my favorite ways to preserve my fruit are as follows:
- Canning – I LOVE canned, sliced peaches. I use a water bath canner to can my peaches. I use low sugar and could eat them year round. Every year we run out and I ask myself why I didn’t can more!
- Jam – It goes without saying that peach jam and boysenberry jam are amazing. Especially the boysenberry. It always goes first and is my first request at Christmas time. I make canned jam as well as freezer jam. It is a great way to preserve your abundant fruit.
- Syrup – We eat whole wheat pancakes probably once a week and so I like to make up fruit syrups for us to enjoy the whole year.
- Freezing – This is the quickest and most nutritious method for storing your fruit. For peaches, I usually like to peel them, slice them, and then place them in large ziploc bags for freezing. I often “flash freeze” them first on a cookie sheet, and then move the frozen fruit to the bags. You can thaw the frozen fruit to make jam or syrup later, for baking, or put it directly into a smoothie (which I make almost daily).
- Baking – I love making cobblers and crisps, and peaches and boysenberries are the perfect addition!

So why am I making peach and boysenberry crisps in January? If you read my Old Fashioned Apple Crisp recipe in the comments section, then you already know:) Our freezer finally bit the dust. I went outside and saw melted ice on the floor. No circuit was tripped this time, it was just dead! There is a lesson here. I like to call it “don’t put all your eggs into one basket.” This phrase is often used for investing, but I’d like to liken it to food storage. It’s important to not just freeze everything or can everything. You need to have a variety of frozen goods, canned goods, and freeze dried goods (earthquake proof). I have all three, and boy am I glad! We caught the freezer catastrophe just in time. While the fruit was partially thawed, there were still some ice crystals and I knew it was still good to use. Since we don’t have a second big freezer, I put what I could into my little freezer and then started baking!

I had peaches, boysenberries, apricots, and plums that all needed to be used ASAP. I decided that I would purchase some disposable 9×13 aluminum pans and make as many crisps as I had fruit for to give to others (as well as to enjoy as a family). It was a fun service project and a way to make the best of our circumstances.

To make my peach and boysenberry crisps as well as fruit cobblers, I set out nine baking pans in a row. I poured out any extra juice from the thawing fruit so that the crisp wouldn’t be too runny. I then poured the fruit into the baking pans until the bottom of each was covered in a good layer of fruit (don’t worry, I’ll give the exact amounts in the recipe below). I then poured 1/2 sugar and 1/4 c cornstarch into each 9×13 baking dish.
I stirred it together and then made the crumb topping. The crisp topping consists of flour, sugar, egg, baking powder, salt, and shortening (or real butter). I used a pastry cutter to blend all of the ingredients together until they had a crumbly consistency (you can also use a knife and a fork).

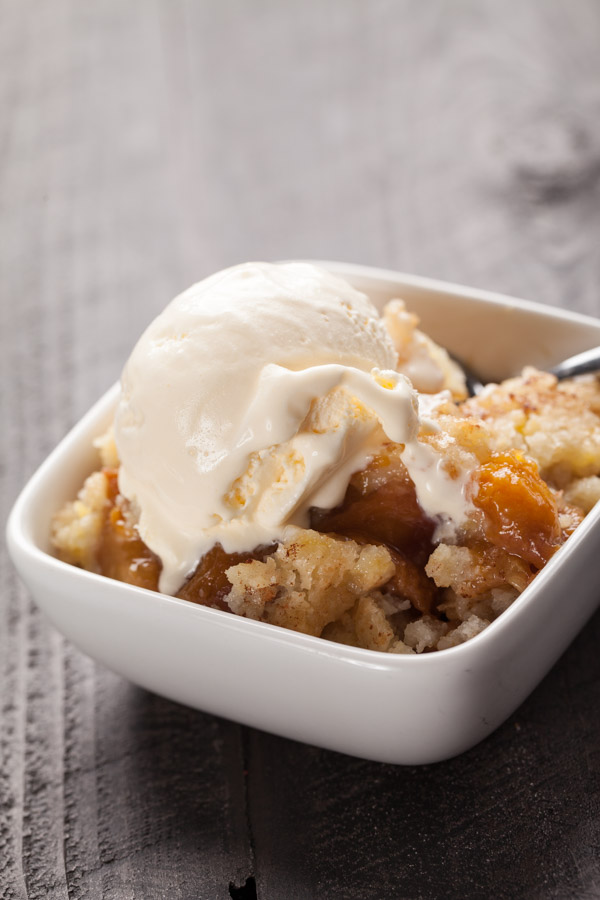
I sprinkled the topping over all the peach and boysenberry crisp pans and then baked them for about 45 minutes in a 350 degree F oven. (Some took a little bit longer. You want the topping to have a nice golden brown.) I served it with vanilla ice cream and then started making deliveries! Something bitter was turned into something sweet!

Here is the basic recipe:
- 5-6 peaches, peeled, cored, and sliced
- 1 c boysenberries
- ½ c sugar
- ¼ c cornstarch
- 1 c flour
- 1 c sugar
- 1 tsp. baking powder
- ¾ tsp. salt
- 1 egg
- ⅓ c shortening (or butter)
- ½ tsp. cinnamon
- Preheat the oven 350 degrees F.
- In a greased 6"x10" baking dish, mix together the fruit, sugar, and cornstarch.
- In a separate bowl, combine flour, sugar, baking powder, salt, egg, and shortening. Cut it together using a pastry cutter or knife and fork.
- Sprinkle crumbly topping all over the fruit mixture and sprinkle with cinnamon.
- Bake at 350 degrees F for 30-40 minutes or until the top is a light golden brown.
- Allow to cool for about 10 minutes before serving so that the juices can congeal.
- Serve with vanilla ice cream, if desired.

Ooo…it looks so good I’m drooling! Wish I were there to eat some of it. 😉
I do too! We’ve definitely had our fill:) Stay warm with all that snow!
Yummy! Great pictures Juventa!
Thank you:)
Looks great, thanks for the recipe!
( we have extra room in our freezer at the moment if you need a place to store a few things. )
Awesome! I will let you know if we do. Right now my little freezer is packed!
What beautiful photographs. They look amazing. Makes me want to make some right now!
Thank you:)